A roof leak around vent is one of the most common roofing problems homeowners encounter. While the leak may appear minor at first, water entering around a roof vent can quickly damage insulation, ceilings, drywall, and even structural components. Roof vents play an essential role in attic ventilation, but they can also become vulnerable points when flashing, seals, or surrounding roofing materials deteriorate.
Understanding what causes these leaks and how to address them promptly can save significant repair costs. This guide explains the warning signs, common causes, repair methods, and preventive measures associated with a roof leak around vent. By the end, you’ll know how to identify potential problems early and protect your home from long-term water damage.
Common Causes of Vent Pipe Leaks
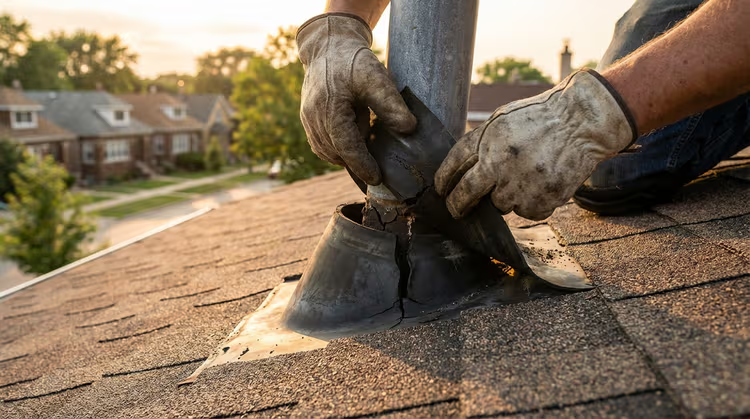
A roof vent penetration creates an opening through the roofing system. To prevent water intrusion, contractors install flashing and protective seals around the vent.
Over time, these components may wear out.
Several factors contribute to vent-related leaks:
- Cracked vent flashing
- Deteriorated rubber boot seals
- Missing roofing nails
- Improper installation
- Weather-related damage
- Aging roofing materials
- Wind-driven rain
- Ice dam formation
Even a small crack can allow moisture to enter beneath shingles. As water travels downward, homeowners may notice stains or damp spots inside the home.
Damaged Vent Flashing
Flashing acts as a waterproof barrier around roof penetrations.
When flashing becomes loose, cracked, rusted, or improperly sealed, water can easily bypass the protective layer. Damaged flashing remains one of the leading causes of a roof leak around vent and often requires prompt replacement.
Warning Signs of Water Damage Near Roof Vents
Leaks rarely announce themselves immediately. Instead, subtle signs often appear before major water intrusion becomes visible.
Recognizing these symptoms early can prevent costly repairs.
Common warning signs include:
- Ceiling water stains
- Damp attic insulation
- Mold growth
- Peeling paint
- Musty odors
- Wet drywall
- Discolored ceiling surfaces
- Dripping water during storms
Homeowners sometimes assume a stain directly identifies the leak location. However, water often travels along rafters before becoming visible indoors.
Interior Indicators to Watch For
The attic often provides the first clues.
Inspect for:
- Dark water marks
- Wet wood framing
- Damp insulation
- Rusted fasteners
- Condensation buildup
Regular inspections help detect a roof leak around vent before significant structural damage develops.
How Roof Vent Flashing Protects Your Home
Roof flashing serves as one of the most important components of a weatherproof roofing system.
Installed around roof penetrations, flashing directs water away from vulnerable openings and safely channels moisture down the roof surface.
Without effective flashing, even a relatively new roof may develop leaks.
Components of a Vent Flashing System
Most vent flashing assemblies include:
- Metal flashing base
- Rubber pipe boot
- Waterproof sealant
- Roofing shingles
- Fastening hardware
Each component must work together to create a watertight barrier.
If one element fails, water can enter beneath the roofing materials.
A properly installed flashing system significantly reduces the likelihood of a roof leak around vent and extends the lifespan of surrounding roofing materials.
How Weather Contributes to Vent Leaks
Weather conditions play a major role in roofing performance.
Repeated exposure to environmental stress gradually weakens roofing materials and protective seals.
Several weather events can accelerate deterioration:
- Heavy rainfall
- Strong winds
- Snow accumulation
- Ice dams
- Freeze-thaw cycles
- Hail impacts
- Extreme temperature changes
As materials expand and contract, seals around roof penetrations may crack or separate.
Winter Roofing Challenges
Cold climates present unique concerns.
Snow accumulation around vent pipes can trap moisture. When temperatures fluctuate, melting snow may refreeze and create ice dams.
These conditions increase the risk of water intrusion around roof penetrations.
Consequently, homeowners often discover a roof leak around vent during late winter or early spring.
Professional Roof Leak Inspection Process
Accurate diagnosis remains essential for effective repairs.
A professional inspection helps identify both visible and hidden sources of water intrusion.
Roofing specialists typically evaluate:
- Vent flashing condition
- Shingle integrity
- Roof decking
- Attic moisture levels
- Sealant performance
- Vent boot condition
- Surrounding roofing materials
Advanced moisture detection tools often reveal hidden damage that cannot be seen during a basic visual inspection.
Why Professional Assessments Matter
Many homeowners attempt temporary repairs without identifying the actual source of the leak.
Unfortunately, this approach may only mask the problem.
Professional inspections provide:
- Accurate leak identification
- Long-term repair recommendations
- Damage assessment
- Preventive maintenance advice
Early intervention often prevents more expensive repairs later.
Repair Solutions for Roof Vent Leaks
Repair options depend on the condition of the vent assembly and surrounding roofing system.
Minor issues may require simple fixes, while more extensive damage could involve component replacement.
Common repair methods include:
- Replacing vent boots
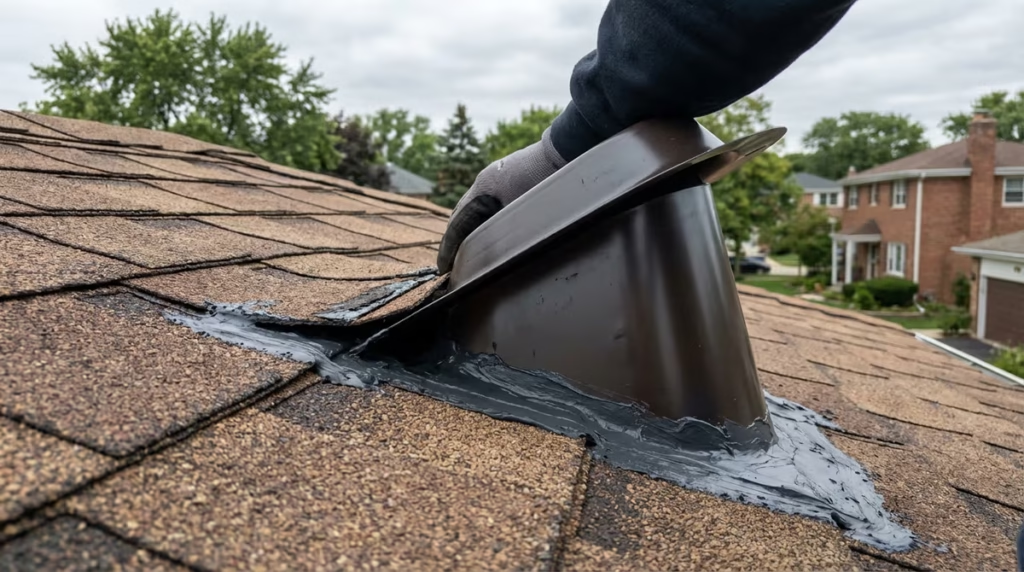
- Installing new flashing
- Resealing joints
- Replacing damaged shingles
- Repairing roof decking
- Addressing attic moisture issues
The most effective solution depends on the underlying cause.
Vent Boot Replacement
Rubber vent boots naturally deteriorate with age.
Exposure to sunlight and changing temperatures causes cracking and brittleness.
Replacing a worn vent boot often resolves a roof leak around vent and restores proper waterproof protection.
Flashing Replacement
When flashing corrodes or separates from the roof surface, replacement becomes necessary.
New flashing creates a durable barrier and helps prevent recurring leaks.
Preventing Future Roof Vent Problems
Preventive maintenance remains the best defense against roofing issues.
Routine inspections help identify small problems before they become expensive repairs.
Recommended maintenance practices include:
- Annual roof inspections
- Post-storm assessments
- Gutter cleaning
- Attic ventilation checks
- Sealant inspections
- Prompt minor repairs
Proactive maintenance extends roof lifespan and improves overall performance.
Seasonal Roof Maintenance Tips
Spring:
- Check for winter damage
- Inspect flashing and seals
Summer:
- Evaluate vent boots
- Address minor deterioration
Fall:
- Remove debris
- Prepare for winter conditions
Winter:
- Monitor snow accumulation
- Watch for ice dam formation
Consistent maintenance significantly reduces the likelihood of developing a roof leak around vent.
When Should You Call a Roofing Professional?
Some roofing issues appear simple but involve hidden complications.
Professional assistance becomes important when:
- Water damage is visible indoors
- Multiple leaks are present
- Flashing is severely damaged
- Roof decking shows deterioration
- Mold growth has developed
- Leaks continue after repairs
Experienced contractors possess the tools and expertise needed to diagnose and resolve complex roofing issues safely.
Attempting extensive roof repairs without proper training can create additional damage and safety risks.
When in doubt, scheduling a professional inspection is often the most cost-effective decision.
Conclusion
A roof leak around vent may start as a minor issue, but it can quickly lead to costly structural damage if ignored. Vent flashing, rubber boots, roofing materials, and weather exposure all contribute to the condition of roof penetrations over time.
Recognizing warning signs early, scheduling routine inspections, and addressing minor repairs promptly can help protect your home from extensive water damage. Regular maintenance also extends the life of your roofing system and improves overall performance.
If you suspect a roof leak around vent, consider arranging a professional inspection as soon as possible. Taking action today can prevent larger problems and help maintain the long-term integrity of your roof.
Frequently Asked Questions
1. What causes a roof leak around vent?
Common causes include damaged flashing, cracked vent boots, aging roofing materials, and improper installation.
2. Can a roof leak around vent cause mold?
Yes. Moisture entering through roof penetrations can create conditions that encourage mold growth.
3. How do I know if vent flashing is damaged?
Look for rust, cracks, loose sections, or visible gaps around the vent pipe.
4. Is a roof leak around vent an emergency?
It can become urgent if water is actively entering the home or damaging structural materials.
5. How much does vent flashing replacement cost?
Costs vary depending on roof type, accessibility, and the extent of damage.
6. Can I repair a roof leak around vent myself?
Minor sealing may be possible, but professional diagnosis is recommended for lasting repairs.
7. How long do vent boots typically last?
Most vent boots last between 10 and 20 years depending on climate and material quality.
8. Will insurance cover a roof vent leak?
Coverage depends on the cause of the damage and the terms of your policy.
9. How often should roof vents be inspected?
Roof vents should be inspected annually and after major storms.
10. Can weather cause a roof leak around vent?
Yes. Rain, wind, snow, ice dams, and temperature fluctuations can all contribute to vent leaks.